
How to Assemble Your Pattern
When you purchase a sewing pattern you receive a file in .zip format (if you don’t have software to open it you can download it free here) containing several other files:
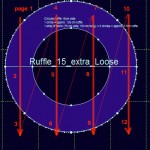 The next step is to assemble the pages. Look at the print overview to see how the pattern pieces are arranged on the paper. Page 1 is the top left corner, attach page 2 below etc.
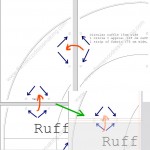 Each page has pairs of small rectangular marks on the sides that have adjacent pattern pieces. Overlap the pages so that the marks are positioned on top of each other and join the pages using sticky tape. Then cut out the pieces along the outer (cut) line and you are ready to use your pattern.
TIP: Before printing and assembling your pattern click the icon below to download, print and assemble a 4 page print test. It contains a 35cm x 35cm rectangle plus 1.5cm seam allowance (like most pattern pieces) and allows you to check your settings and make sure your pattern, once assembled, will be the corrrect size.

- Your pattern file(s) in .pdf format (you need Acrobat Reader to open it, available for free download here). For printing on your home printer there is a version for A4 and one in Letter size paper.
- a print overview of your pattern pages in .jpg format, indicating how the pattern pieces are arranged on the pages
- Suggested fabric layout incl. yardage requirements (based on a fabric width of 150cm). If your fabric has stripes or other prints that need to match up or direction matters like for velvets you’ll need more fabric than indicated.
 The next step is to assemble the pages. Look at the print overview to see how the pattern pieces are arranged on the paper. Page 1 is the top left corner, attach page 2 below etc.
 Each page has pairs of small rectangular marks on the sides that have adjacent pattern pieces. Overlap the pages so that the marks are positioned on top of each other and join the pages using sticky tape. Then cut out the pieces along the outer (cut) line and you are ready to use your pattern.
TIP: Before printing and assembling your pattern click the icon below to download, print and assemble a 4 page print test. It contains a 35cm x 35cm rectangle plus 1.5cm seam allowance (like most pattern pieces) and allows you to check your settings and make sure your pattern, once assembled, will be the corrrect size.
No hay comentarios:
Publicar un comentario